Workshop 06: Unterschied zwischen den Versionen
Die Seite wurde neu angelegt: „== Webserver-Einrichtung auf Raspberry Pi == === Installation === * Apache und PHP auf dem Raspberry installiert. <syntaxhighlight lang="bash"> sudo apt-get install apache2 -y sudo apt-get install php php-mysql sudo systemctl start apache2 sudo systemctl enable apache2 </syntaxhighlight> === MySQL & PhpMyAdmin === * MySQL & PhpMyAdmin auf dem Raspberry installiert und konfiguriert. <syntaxhighlight lang="bash"> sudo apt-get install mariadb-server sudo s…“ |
|||
| (12 dazwischenliegende Versionen desselben Benutzers werden nicht angezeigt) | |||
| Zeile 3: | Zeile 3: | ||
=== Installation === | === Installation === | ||
* Apache und PHP auf dem Raspberry installiert. | * Apache und PHP auf dem Raspberry installiert. | ||
< | <code bash> | ||
sudo apt-get install apache2 -y | sudo apt-get install apache2 -y<br> | ||
sudo apt-get install php php-mysql | sudo apt-get install php php-mysql<br> | ||
sudo systemctl start apache2 | sudo systemctl start apache2<br> | ||
sudo systemctl enable apache2 | sudo systemctl enable apache2 | ||
</ | </code> | ||
<gallery mode="packed" heights="300px"> | |||
File:apache2instal.png|'''Apache wird hier installiert''' | |||
File:apache2bestätiugung.png|'''Erfolgreiche Installation''' | |||
</gallery> | |||
=== MySQL & PhpMyAdmin === | === MySQL & PhpMyAdmin === | ||
* MySQL & PhpMyAdmin auf dem Raspberry installiert und konfiguriert. | * MySQL & PhpMyAdmin auf dem Raspberry installiert und konfiguriert. | ||
< | <code bash> | ||
sudo apt-get install mariadb-server | sudo apt-get install mariadb-server<br> | ||
sudo systemctl start mariadb | sudo systemctl start mariadb<br> | ||
sudo systemctl enable mariadb | sudo systemctl enable mariadb<br> | ||
sudo mariadb-secure-installation | sudo mariadb-secure-installation<br> | ||
<br> | |||
sudo apt-get install phpmyadmin<br> | |||
sudo ln -s /etc/phpmyadmin/apache.conf /etc/apache2/conf-available/phpmyadmin.conf<br> | |||
sudo a2enconf phpmyadmin.conf<br> | |||
sudo service apache2 restart<br> | |||
sudo dpkg-reconfigure -plow phpmyadmin | |||
</code> | |||
<gallery mode="packed" heights="300px"> | |||
File:phpinstall.png|'''Folgende Befehle haben wir eingegeben''' | |||
File:phpinstall2.png|'''Installation von PhP''' | |||
File:phpserveranmeldung.png|'''Anmelden auf dem PhP Server''' | |||
</gallery> | |||
</ | |||
=== PhpMyAdmin Login === | === PhpMyAdmin Login === | ||
| Zeile 30: | Zeile 41: | ||
http://<IP-Adresse-des-Raspberry>/phpmyadmin | http://<IP-Adresse-des-Raspberry>/phpmyadmin | ||
</pre> | </pre> | ||
<gallery mode="packed" heights="300px"> | |||
File:phpangemeldet.png|''' Nach dem man angemeldet ist sieht das so aus''' | |||
File:erfolgreiche installation.png|'''Erfolgreiche Installation von PhP''' | |||
</gallery> | |||
=== FTP Installation === | === FTP Installation === | ||
* FTP auf dem Raspberry installiert. | * FTP auf dem Raspberry installiert. | ||
< | <code bash> | ||
sudo apt-get install proftpd | sudo apt-get install proftpd<br> | ||
sudo nano /etc/proftpd/proftpd.conf | sudo nano /etc/proftpd/proftpd.conf | ||
</ | </code> | ||
<gallery mode="packed" heights="300px"> | |||
File:ftpd_install.png|'''FTP wird installiert''' | |||
File:ftpd_server_configuriert.png|'''FTP wird hier konfiguriert''' | |||
</gallery> | |||
Konfigurationsinhalt: | Konfigurationsinhalt: | ||
| Zeile 48: | Zeile 69: | ||
Benutzer erstellen und Rechte setzen: | Benutzer erstellen und Rechte setzen: | ||
< | <code bash> | ||
sudo ftpasswd --passwd --name ftpuser --uid 33 --gid 33 --home /var/www/ --shell /bin/false | sudo ftpasswd --passwd --name ftpuser --uid 33 --gid 33 --home /var/www/ --shell /bin/false<br> | ||
sudo chmod g+s /var/www | sudo chmod g+s /var/www<br> | ||
sudo chmod 775 /var/www | sudo chmod 775 /var/www<br> | ||
sudo chown -R www-data:www-data /var/www | sudo chown -R www-data:www-data /var/www<br> | ||
sudo reboot | sudo reboot | ||
</ | </code> | ||
== | <gallery mode="packed" heights="300px"> | ||
File:ftp_benutzer_angelekt.png|'''Benutzer wird hier angelegt''' | |||
</gallery> | |||
=== CMS Installation === | === CMS Installation === | ||
* Ein CMS installiert, z. B. WordPress oder Joomla, eine Defaultseite geladen und Gruppenmitglieder darauf erwähnt. | * Ein CMS installiert, z. B. WordPress oder Joomla, eine Defaultseite geladen und Gruppenmitglieder darauf erwähnt. | ||
< | <code bash> | ||
cd /var/www/html/ | cd /var/www/html/<br> | ||
sudo rm index.* | sudo rm index.*<br> | ||
sudo wget https://wordpress.org/latest.tar.gz | sudo wget https://wordpress.org/latest.tar.gz<br> | ||
sudo tar xzf latest.tar.gz | sudo tar xzf latest.tar.gz<br> | ||
sudo mv wordpress/* . | sudo mv wordpress/* .<br> | ||
sudo rm -r latest.tar.gz wordpress | sudo rm -r latest.tar.gz wordpress<br> | ||
sudo chown -R www-data: . | sudo chown -R www-data: . | ||
</ | </code> | ||
<gallery mode="packed" heights="300px"> | |||
File:php_index.png|'''Zugriff auf die Index Datei''' | |||
File:WordPress_installiert.png|'''So wird WordPress installiert''' | |||
File:wordpress_am_richtigen_ort.png|'''WordPress wird hier an den richtigen Ort verschoben''' | |||
</gallery> | |||
Browserzugriff: | Browserzugriff: | ||
| Zeile 78: | Zeile 103: | ||
http://<IP-Adresse-des-Raspberry>/index.php | http://<IP-Adresse-des-Raspberry>/index.php | ||
</pre> | </pre> | ||
<gallery mode="packed" heights="300px"> | |||
File:wordpressweb.png|'''Zugriff auf WordPress''' | |||
File:wordpress_setup.png|'''So wird WordPress Setup gemacht''' | |||
File:zugriff_auf_WP.png|'''Installation von WordPress hat funktioniert''' | |||
File:Word_press_anmeldung.png|'''Anmeldung in unseren WordPress Account''' | |||
File:word_press_angemeldet.png|'''Dashboard von WordPress''' | |||
File:webserver_steht.png|'''Testseite auf unserem WordPress Seite''' | |||
</gallery> | |||
Aktuelle Version vom 14. April 2025, 10:24 Uhr
Webserver-Einrichtung auf Raspberry Pi
Installation
- Apache und PHP auf dem Raspberry installiert.
sudo apt-get install apache2 -y

sudo apt-get install php php-mysql

sudo systemctl start apache2

sudo systemctl enable apache2
-
 Apache wird hier installiert
 -
 Erfolgreiche Installation


MySQL & PhpMyAdmin
- MySQL & PhpMyAdmin auf dem Raspberry installiert und konfiguriert.
sudo apt-get install mariadb-server

sudo systemctl start mariadb

sudo systemctl enable mariadb

sudo mariadb-secure-installation


sudo apt-get install phpmyadmin

sudo ln -s /etc/phpmyadmin/apache.conf /etc/apache2/conf-available/phpmyadmin.conf

sudo a2enconf phpmyadmin.conf

sudo service apache2 restart

sudo dpkg-reconfigure -plow phpmyadmin
-
 Folgende Befehle haben wir eingegeben
 -
 Installation von PhP
 -
 Anmelden auf dem PhP Server


PhpMyAdmin Login
- Sich in PhpMyAdmin einloggen (im Browser)
http://<IP-Adresse-des-Raspberry>/phpmyadmin
-
 Nach dem man angemeldet ist sieht das so aus
 -
 Erfolgreiche Installation von PhP


FTP Installation
- FTP auf dem Raspberry installiert.
sudo apt-get install proftpd

sudo nano /etc/proftpd/proftpd.conf
-
 FTP wird installiert
 -
 FTP wird hier konfiguriert


Konfigurationsinhalt:
DefaultRoot ~
AuthOrder mod_auth_file.c mod_auth_unix.c
AuthUserFile /etc/proftpd/ftpd.passwd
AuthPAM off
RequireValidShell off
Benutzer erstellen und Rechte setzen:
sudo ftpasswd --passwd --name ftpuser --uid 33 --gid 33 --home /var/www/ --shell /bin/false

sudo chmod g+s /var/www

sudo chmod 775 /var/www

sudo chown -R www-data:www-data /var/www

sudo reboot
-
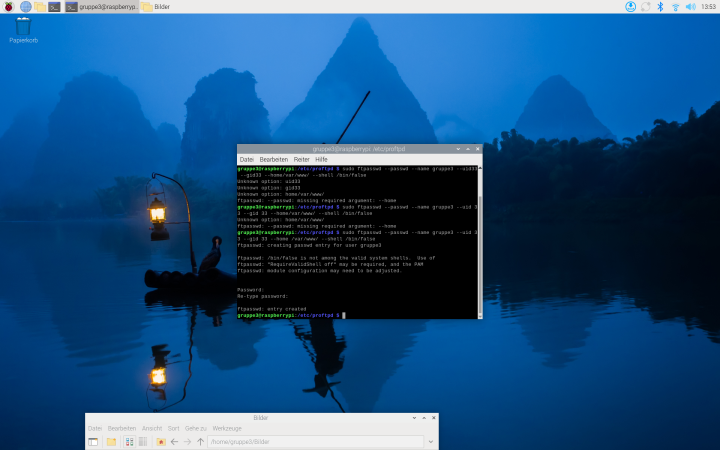 Benutzer wird hier angelegt

CMS Installation
- Ein CMS installiert, z. B. WordPress oder Joomla, eine Defaultseite geladen und Gruppenmitglieder darauf erwähnt.
cd /var/www/html/

sudo rm index.*

sudo wget https://wordpress.org/latest.tar.gz

sudo tar xzf latest.tar.gz

sudo mv wordpress/* .

sudo rm -r latest.tar.gz wordpress

sudo chown -R www-data: .
-
 Zugriff auf die Index Datei
 -
 So wird WordPress installiert
 -
 WordPress wird hier an den richtigen Ort verschoben


Browserzugriff:
http://<IP-Adresse-des-Raspberry>/index.php
-
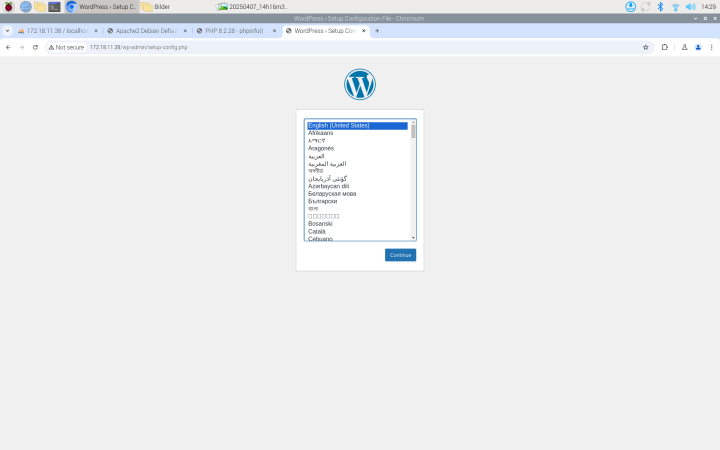 Zugriff auf WordPress
 -
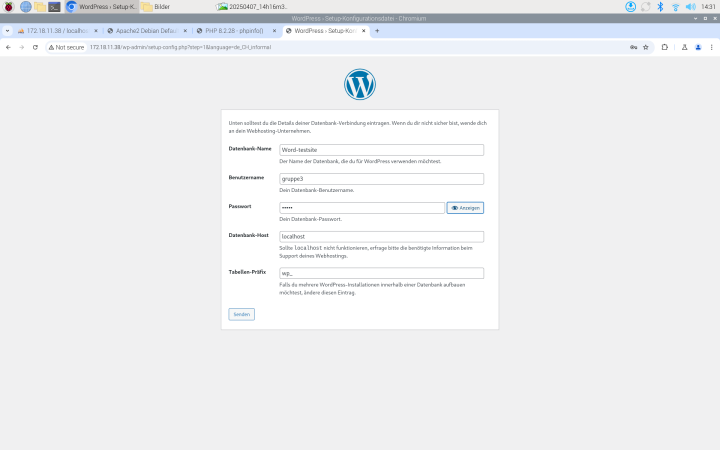 So wird WordPress Setup gemacht
 -
 Installation von WordPress hat funktioniert
 -
 Anmeldung in unseren WordPress Account
 -
 Dashboard von WordPress
 -
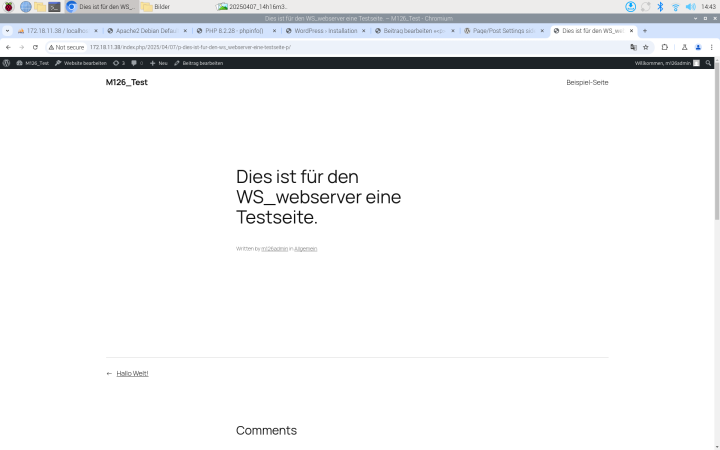 Testseite auf unserem WordPress Seite


